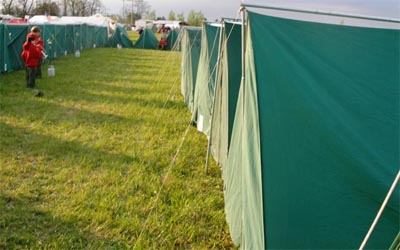
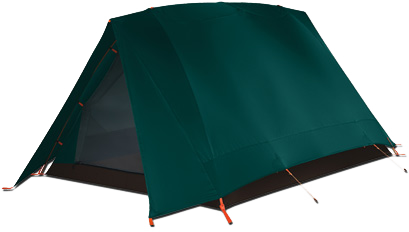
| Troop 179 Tents  The Voyageurs Tent The Voyageurs Tent This tent is used by the boys in our Scout Skills Program. They are issued one tent to every two Scouts and are made of heavy canvass by the Boy Scouts of America. A complete tent includes the Tent Bag, the Tent, two 6’ poles (poles are telescoping poles with four sections), one 8’ ridge pole (also broken down into four pieces), and 12 tent stakes. The tent is a two boy tent measuring 6’ high, 8’7” deep and 7’ wide has so much room it can sleep three! Need more space for storage? Pullout on each side does the job fast. Comes with storage bag with imprinted instructions on tent care and set-up. Flore of 8-oz laminated nylon, has mosquito netting and vent. Voyageurs Tent Care Canvas tents can maintain their utility for up to 30 years or more. They are made of high-quality, heavy-gauge canvas that holds up to years of use. To keep the tent from mildewing it is particularly important to make sure they are thoroughly dried in between camping trips. Wash the tent with cold clean water and brush with soft-bristle brushed to remove dirt and debris. Do not use soap, detergent or cleaning solutions. Do not let tree sap, bird droppings or other debris remain on the canvas surface. It is best to keep hairsprays or insecticides from touching the canvas fabric. Preventing Mildew Because canvas can absorb moisture from wet clothing or other objects inside the tent, it can become damp even if it has not been in the rain. Drying it thoroughly may mean setting the tent up to dry for several days in the back yard after returning home. If mildew occurs, use a mildew-remover especially made for canvas tents. Do not attempt to place a canvas tent in the dryer or use heat on the fabric. Waterproofing Your Tent You can treat your canvas and seams once a year with waterproofing sprays that can be purchased from an outdoor outfitting store. Allow to dry thoroughly before packing. Storing Your Canvas Tent Dry the tent thoroughly before storing it away. It should not be covered with a tarp or plastic sheeting because the covering will prevent airflow and allow for mold or mildew growth. Sweep carefully after each use to remove food particles that can bring pests. The Eureka! Timberline Tent  This tent is used by our Boy Scout and Venture Programs. They are issued one tent to every two Scouts and are made of Nylon by the Eureka! Tent Company. It features: This tent is used by our Boy Scout and Venture Programs. They are issued one tent to every two Scouts and are made of Nylon by the Eureka! Tent Company. It features: - SQ Hub: The proprietary SQ hub offers strength and optimum angles to create internal volume for excellent livability.
- Mid-Span Pole Spreader: The mid-span ridge pole spreader bar accentuates the curves in the tent body, adding internal volume to the A-frame.
- Vertical Doors: Two large vertical D-style doors with Hi/Low venting offer ease of access and enhance ventilation.
- Interior Pockets: Interior pockets keep essentials close at hand.
- Vestibule: Tent vestibule provides extra room to store gear.
- Bathtub Floor: Bathtub floor wraps up sides of tent, protecting against splashing and standing water.
DOWNLOAD INSTRUCTIONS FOR SETTING UP TO TIMBERLINE TENT Timerline Tent Care Cleaning Clean the tent by setting it up and wiping it down with a mild soap (liquid hand soap) and lukewarm water solution. Rinse thoroughly and dry completely. Never use detergent, washing machines or dryers because they can damage the tent's protective coating and seams. After cleaning, be sure the tent is completely dry, especially the heavier, double-stitched areas such as the seams, before storing or mold and mildew are likely to grow.
Clean the tent poles with a soft, dry cloth. This is especially necessary after oceanside camping trips to remove salt spray so the poles don't corrode or stay gritty.
Clean the zippers with a quick dip in water and then dry them off. This is especially important if you've been camping in a location with sand/dirt. If you don't clean the zippers, the sliders will wear out and eventually the teeth will become inoperable. Seam Sealing
We recommend use of a sealer such as Kenyon Seam Sealer 3 or McNett Outdoor SeamGrip. Be sure to check directions on the side of container for specifics before beginning the seam sealing process.
Seam sealing should be done in a fully ventilated area. Set the tent up or lay the tent out flat. Taut seams allow for even application and penetration of the sealer.
Decide which seams need to be sealed. For example, seams that will be exposed to rain, runoff, or ground level water are a must for sealing, while seams on uncoated nylon or mesh panels won't need treatment. You won't need to seal the seams in the roof or the factory taped seams either. We recommend sealing both floor & fly seams and reinforcements.
Apply sealant to the inside and outside of all exposed seams. Draw or brush the sealant along the seam, spreading it evenly and liberally into all of the needle holes. Several thin layers will work better than one thick layer. Allow 30 minutes to 1 hour for the sealant to completely dry before storing the tent. Twelve hours for SeamGrip®.
Storage
Make sure the tent is completely dry, then store loosely rolled, in a dry, cool place. To prevent dust from collecting on the tent, cover it with a cloth. This allows the nylon/polyester fabric to breathe.
Ideally, the tent poles should be stored in their fully assembled state. This reduces the tension on the shock cord, prolonging its life. We recommend that the tent bag be used only as a carry sack and not for storage.
General Tips - Use a ground cloth under the tent whenever possible. If you choose, Eureka! has pre-cut sizes. If not, trace the tent on the ground cloth and cut smaller than the tent footprint to avoid having it act as a water collector. Ground cloths are easier and less expensive to replace than torn tent floors.
- Try not to wear shoes inside your tent.
- Bring a small rug or mat to put inside the tent door to wipe off mud and catch sand.
- Sweep the tent floor daily to prevent damage from stones.
- Do not keep food inside the tent. Hungry critters will chew through the tent fabric in search of a snack.
|